Thursday, September 15, 2016

(R)AWESOME!!!

I had a great experience with raw images. I knew that raw photos give you lot of control for post processing but I had never tried it. I found 2 free windows applications for editing RAW images clicked by Canon cameras ( I am having canon 550D)
  1. Picture Style Editor (Link: http://picture-style-editor.en.lo4d.com/)
  2. Digital Photo Professional 4 by Canon (Link: http://www.canon-europe.com/support/)
    You need to specify the model of the camera as well as the serial number to download this application.
The following photos will give you an idea of the editing controls we get in RAW images without losing the quality
Original RAW ImagesPost Processing Images
 
The image was under-exposed and details were not visible

Increased the exposure and sharpened the image for better details

The image was over-exposed and looked flat 

Corrected the exposure and made colour changes to make the image look vibrant

Saturday, August 27, 2016

Long way to go for Perfection!!!

Heading there for sure at my own pace.
Well some more star trail photos. This time they are more visible and accurate. The below photo was taken to get the visibility of the sky.


The next two photographs are the real attempts at star trail photography. I am also inserting the videos of the star movement that was captured in the photos.

Video Photo

Saturday, August 20, 2016

I am back!!!

Hi all,

Apologies as I have been very irregular at updating the blog and sharing new photos and tips. As there is lot of info about photography around us, there was lack of motivation on my part.
So here's some more photos and tips.
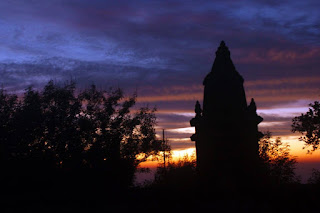
  • Silhouette:This photographs was taken at Raigad fort. I have a Canon 550D (Rebel T2i). After using the camea for 4-5 years I have understood one thing that to get noise-less photos I can not increase my ISO more than 800. This photograph has similar settings. ISO was 800 and shutterspeed of 1/30th so that I could capture the stillness of the clouds (You will come to know regarding the moving clouds in further reading) and also the silhouette of the temple. The sky colours were amazing.


  • Bokeh Background:
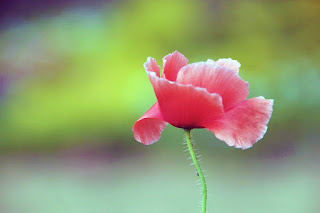
    This effect can be achieved if  there is a long distance between the foreground and background of your photo. In the below image you can see the flower is in focus and the background is totally out of focus (bokeh). These kind of effect gives a very good depth of field and your subject pops out in the photo. I am using 18-270 mm Tamron lens. I clicked the photo with a zoom of approx 180mm and aperture of 3.5 due to which I got this effect. Higher the aperture (numerically) of the camera lower the depth of field you will achieve. Actually in reference to aperture lower the number of the aperture higher amount of light is captured by the camera.

  • Motion in still image:
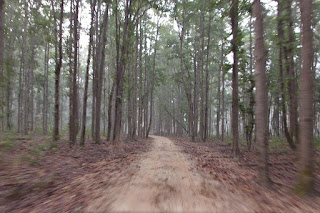
    The heading is a bit confusing but the photo will explain it. If you see the photo you could feel that it was clicked while I was moving. The road in the centre of the photo is still and in focus but you can see the motion blur around the edges of the photo. To get this effect you need to have a long exposure to get the movement. I was in the moving gypsy. The shutter-speed i used for this photo was approx 1/20 and the ISO was 800.

  • Moving clouds:
    This photo is similar to the previous one but the only difference is that the above photo was taken during day time and the below photo is taken during the night at approx 9.00 9.30 p.m.
    To minimise the noise in the photo I kept the ISO to 400. The aperture was 3.5 and the shutter-speed was 20 seconds (tripod use was mandatory)


    Sunday, March 23, 2014

    Once again Star trail


    Readers may get fed-up by reading about the same topic on my blog. But I would not stop until I get a good and satisfactory star-trail photo.
    I am nearing to my goal of a perfect star trail photo. The above pic was clicked by Yashica FX-3
    Due to the moonlight many stars were washed out. Next time I will have to check the moon-rise and moon-set timing and go for the star trail photo.
    In the pic, technically all the things are in place. I did take a still object in the foreground to get a nice depth for the photo and also kept the shutter open for 1 hour. 
    But the timing was not right. It was 7th or 8th day from new moon. The moonlight was strong enough to spoil the photo. 
    Next time hopefully I would be able to take a nice and near to perfect Star-trail photo.

    Monday, August 20, 2012

    Better Star Trails


    Once again it’s been a long time since I wrote anything regarding photography.
    But this time I am having some better pics of star trails taken with my new Canon 550D.
    I had specially gone to Raigad fort, the capital of Maratha kingdom to get a clear sky. I chose 19th May 2012 to go to Raigad. Checked the moon rise and moon set timings on http://timeanddate.com and then decided to go. The situation was such that the moon was setting on 19th evening and was going to rise on the 20th morning, so I was going to get a starry sky. The site also helped me in checking the weather conditions on the given day which were clear. So completely equipped with my camera and tripod I went to Raigad. For the whole day of 19th I looked around the fort, took some snaps. My guide provided me lunch. He also allowed me to take an afternoon nap in his house. I also had dinner at his place. My plan was to stay awake full night near the statue of Shivaji maharaj and get some nice star trail photos.
    I was ill prepared in two departments. Since it was the month of May I thought I would not need any blanket. But I was totally wrong, it was chilling cold. The second misjudgement was regarding the camera battery. I should have carried an extra battery which I did not and I missed at least 2 photos of star trails of my liking. Nevertheless I am happy with the photos I clicked but not yet satisfied.
    Following are the photos and some description regarding them.

    This photo does not come under star trail category. This click was just to get idea whether the statue was in focus or not. I had kept the shutter open for around 45 seconds with ISO of 800. Since the stars were bright and clear I was able to get the stars as well in the snap. Even though this was just a trial snap it turned out to be a nice one.

     This is the real star trail photo I wanted to click. It is not a single click. I had kept the camera in continuous shoot mode with the release wire locked for around an hour and each click duration of 30 seconds with ISO 800.There were total of around 120 photos. I compiled all the photos together to get the final result (a drawback of normal digital SLR cameras is that if the shutter is kept open for a longer duration with high ISO a lot of noise is generated in the snap which results in a very bad photo). I used free software called Startrails (http://www.startrails.de/), nice and simple software, to get the final result.

    One more star trail photo. The technique was the same as the previous photo. It was taken during midnight. The glow at the bottom of the photo is that of the artificial lights at the foot of the fort.
    After the third photo, the camera battery drained out and I had to sleep against my wish L.
    This was a nice experience and a big step in learning the star trail photography, which I am keen on improving.
    Will post something as soon as I get a nice photo to write about. 
    Till then keep on clicking and experimenting!!!

    Sunday, May 15, 2011

    Star trails

    This time I have tried to click STAR TRAILS. I have used my SLR camera (film) for the above photograph as my digital camera is not capable to take the above photograph. To get this result I had to keep the shutter open for around 90 minutes. The main requirements for this photograph are complete clear sky and absence of moon and artificial lights.

    The best night for this photograph would be new moon day with lots of stars.

    The absence of artificial lights and moon would be beneficial for minimizing the chances of over-exposing the photograph and erasing the star trails (personal experienceJ).

    Friday, February 25, 2011

    Shutterspeed magic

    Its been a year since I wrote anything about photography. I did click snaps in between but there was nothing new to explain in those photographs.
    This time I would like to share some useful tips about shutter-speed. If you see the above image, you can see the light trails in the background with the still image of the chair in the front. This was achieved by keeping the camera shutter open for about 1 second and using a flash.
    The shutter-speed helped me in getting the trails of the lights and the flash was used to get a bright image of the chair.
    If only the shutter-speed had to be used, we would have to keep it open for at least 3-4 seconds to get the bright image of the chair. To achieve that you need a stable base for the camera such as tripod or a firm rock, but since I had none of these, I used flash.
    If only flash had been used for the chair, then the trails would not have been that prominent.
    Hope you understood what I am trying to explain. If not please let me know.
    Till the next posting see you (I hope it happens soon ;-) )